Projects

Online Farmers Market Class Series- Week 1

Today (Thursday Aug. 18, 2022) started our first class in the Online Farmers Market Series. I just love how fun and easy these projects are. They are great for gift giving, for yourself or to sell at an upcoming Craft Fair or Farmers Market.

We made three great projects today…to see the video scroll down for the YouTube and Facebook Links.

  • Desktop Easel Calendar
  • Easy Treat Box
  • Vellum Wine Glass Shade
Online Farmers Market Week 1

For this class series I am offering FREE, yes FREE project sheets for all the projects made. I also do have an ordering special for the Farmers Market class series. There is one catch, you need to be subscribed to my Email list. It is free to be on, and I don’t share your email address with anyone else. You can subscribe and unsubscribe at any time- but hey if you want the Farmers Market project sheets – sign up now and don’t miss out. Use the button below to sign up! PS. you will receive a free tutorial from me when you sign up!

If you see some products you would like to purchase in my Online Store, please shop using this host code. You will have an opportunity to enter when you check out. If you need assistance placing your order- please reach out to me and I am happy to help. If you are on my Email list, you will also receive a special thank you from me after your order is placed (but only if you use the host code!!!!!)

If you do not already have a demonstrator I would love the opportunity to earn your business. If you would like the most current Mini Catalog, click the button below to request one.

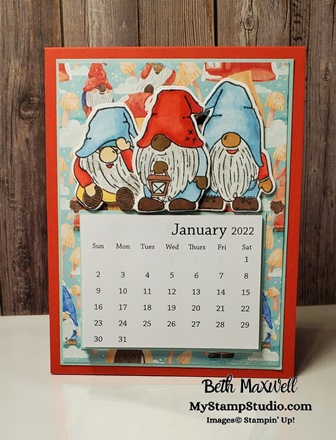
Who wouldn’t love a desktop calendar that is easy to see and not be hidden by all the other stuff on your desk? This easel desktop calendar is so easy to create and is a great seller at craft fairs. For this calendar I featured the Kindest Gnomes Stamp set and Gnomes dies and coordinating Storybook Gnomes Designer Paper. All can be found in my online store (see links below) and if in the Stampin’ Up! July-December 2022 Mini catalog,

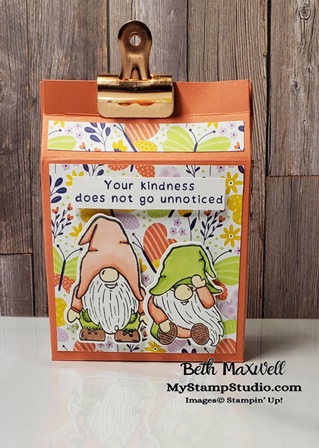
This adorable treat box is easy to make. Just make sure you are using a strong adhesive! This sweet box features the Kindest Gnomes Stamp set and Gnomes dies and the Butterfly Kisses designer series paper. You can use whatever stamp set and Designer papers you have in your Craft Room to make this. In today’s video- I give you all the measurements and instructions so you can make these treat boxes. Fill the box with your favorite treats, candies, gift cards- the options are endless.

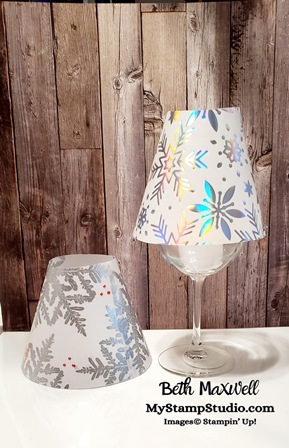
Our last project is a Vellum Wine Glass Shade. It has been a while since I have made these but this is a great gift idea for the Holidays or any time of the year. Just change up your Stamp set. Today I featured the Snow Crystal Stamp found in the Stampin’ Up! July-December 2022 Mini catalog, or as I call it the Holiday Catalog. The first shade uses the stamp and silver embossing on vellum cardstock. As I was Live, I added in making one with the Snowflake Specialty Vellum- this is an AWESOME alternative if you don’t have the supplies to emboss your wine glass shade. Make sure to check out the video it is on Facebook AND on YouTube.

Embossed Wine Glass Shade Supplies

Specialty Vellum Wine Glass Shade supplies

YOUTUBE Video- make sure to subscribe to my YouTube channel so you don’t miss any of my videos!

Facebook Info

Follow My Stamp Studio Facebook Page and here is the Facebook Video Link: Online Farmers Market Week 1. While you are there feel free to join the My Stamp Studio Facebook Group to become part of a Crafting and Stamping community.

Online Farmers Market Class Series- Week 1 Read More »

Hump Day Lunch Break Live 1.19.22 Valentine’s Treat Box

Today’s Lunch Break Live featured a quick and easy Valentine treat box. While this video and project focused on Valentine’s, you could use for an occasion you are gifting a little sumthin’ sumthin’ This Box also has a tag on the front you can personalize

You can watch the Facebook Live Replay on My Stamp Studio (click). If you are not on facebook, you can watch the video on my You Tube channel or here on the post a little further down.

All the products used are from Stampin’ Up!

I started with a piece of Highland Heather cardstock measuring 6 -1/4″ x 11″ I scored along the 11″ side at 2-5/8″, 5-1/4″, 7-7/8″ and 10-1/2″. I turned the cardstock 90 degrees and scored (on the 6-1/4″side at 2-5/8″. I cut the score lines up to the 2-5/8″ score line to create flaps. I then mitered the two inside flaps to be able to form the box bottom. Using Stampin’ seal + I adhered the tabs together by rolling up the box to assemble it.

I created the tag from a 2-3/8″ x 6-1/4″ piece of Real Red Cardstock, folde this in half so your rag is now 2-3/8″ x 3-3/8″ I then adhered a 2-1/4″ x 3-1/4″ piece of the Sweet Talk Designer Paper and adhered it to the Real Red Tag. Punch from Basic White cardstock a Label Me Lovely punch shape. Stamp XO from the Sweet Conversations Stamp set with Highland Heather Classic Ink. On a strip of Basic White cardstock I stamped Happy Valentine’s Day in Highland Heather Classic Ink, trimmed down the words and added tot he punch shape using Mini dimensionals. Watch the You Tube video below to see this quick and easy project.

Hump Day Lunch Break Live 1.19.22 Valentine’s Treat Box Read More »

Hump Day Lunch Break: Facebook Live 2/3/21

Today’s Hump Day Lunch Break was a sweet little gift box with an attached 3 x 3 card, This is such a fun, quick and cute project that can be used to give cards or a little gift. This project features the Hey Birthday Chick bundle that was just made available on Feb. 2, 2021. You can check out the facebook live on my business page click here. Please like my facebook page and share it with others. To be notified of any time I go live make sure to join the My Stamp Studio Group.

Once I made the first gift box, I knew I have to make more. Check out the next pictures to see how I stamped the inside of the card.

I used the Mini Pizza boxes to create these sweet little boxes. I put strips of card stock around the sides to tie it all together. I created the card by cutting a piece of thick basic white cardstock to be 6″ x 3″ I scored it in half to make a 3″ x 3″ card base. I stamped two sentiments and balloons using the Hey Birthday Chick stamp set. I stamped and cut the little chick and the balloons using the coordinating Birthday Chick Dies. I then added a piece of designer paper that measured 3 1/4″ x 3 1/4″ and adhered this to a piece of colored cardstock that measures 3 3/8″ x 3 3/8″. I adhered this to the card base making sure that the top of the layered DSP/Cardstock was even with the scored side of the basic white card base. This allows you to open the card easily. To make the card front I again used the Hey Birthday Chick Stamp set and Birthday Chick dies. I think this turned out pretty cute.

Hump Day Lunch Break: Facebook Live 2/3/21 Read More »