February 2021

Week of Color Day 2- Stampin’ fun with Sunburst Cards

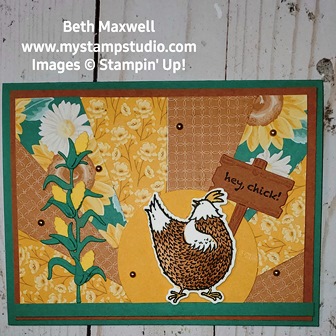
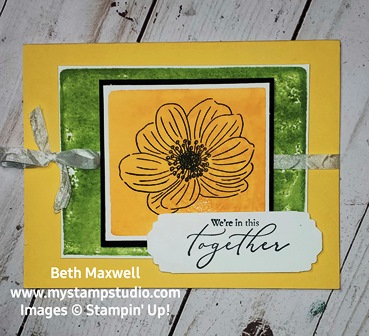
On Day 2 of the Week of Color we focused on using Blender Pens to color our images. In addition I shared this Sunburst technique which is fun way to use up your scraps of designer paper.

To make this card, you will start with a card base which measures 8 1/2″ x 5 1/2″. I used Just Jade in the card above. Next create your first layer of card stock which measures 5 1/4″ x 4 (Cinnamon Cider card stock). To create your Sunburst you will need to start with a peice of white card stock measuring 5″ x 3 3/4″ . Next you will cut two 1 1/2″ x 4″ strips from 3 different designer paper patterns. Cut each of these pieces in half diagonally. You will have 12 triangles. Lay these out on the white card stock in the order you would like to have the paper placed. Once you have determined that you will adhere the middle triangle to the white card stock, I recommend using Tombow multipurpose liquid glue. Make sure that the designer paper covers all the white card stock on the top and two sides. You will have some paper hanging off the edges, that is to be expected. Once you have the enter piece of the white card stock covered you can trim the excess off. Adhere this layer to your 5 1/4″ x 4″ layer of Cinnamon cider card stock. Then add your punches pieces and image to the front of your card. To watch the facebook video click HERE.

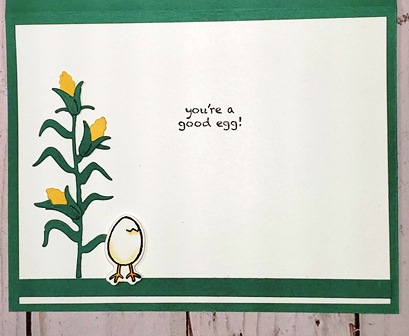
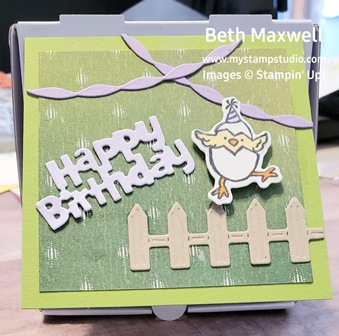
This is the inside of the card. I had a lot of fun using the Dies that coordinate with the Stamp set. They are so stinkin’ cute!!!

Week of Color Day 2- Stampin’ fun with Sunburst Cards Read More »

Week of Color – Day 2 Blender Pens

What are blender pens and how do they work? How do I use them in in paper crafting projects? In Day 2 Week of Color episode, watch how you can use Blender pens to make some adorable cards.

This card was a continuation of Day 1- Spritzing. I used 3 different ink pads and alcohol in my Spritzer to create the back ground and then focused in on the Blender Pen technique on the Butterfly from the Touch of Ink Sale-a-bration stamp set. You can get this stamp set for free when you make a $100 (US) purchase in my ONLINE STORE

You can watch the face book live post here: My Stamp Studio Day 2 Blender Pens Video . Blender Pens are dual-tipped pens filled with specialized solution for easier blending. When used with Stazon Ink and Thick white card stock or Shimmery White card stock you get a extended color palette from just one color of ink. It gives you the option of a gradient color scheme or a watercolor effect.

Supply List ( with product link to my Online Store)

Dimensions of the materials used in the card:

  • Pear Pizzazz Card stock: 8 1/2″ x 5 1/2″ score at 4 1/4″
  • Thick Basic White card stock: 3 1/2″ x 4 1/2″, 2 1/2″ x 2 1/2″, 1″ x 3 1/2″
  • Pool Party Card stock: 3 3/4″ x 4 3/4″

I first stamped the solid leaf image using Pear Pizzazz Ink on the card base. I then created the Tri colored background using the spritz technique by inking the Clear Block E (acrylic block) with Pool Party, Highland Heather and Pear Pizzazz Ink onto the Thick White card stock. I spritzed the block using a Stampin’ Spritzer filled with 70% alcohol. Once that dried I trimmed down to have a slight white border and adhered it to the Pool Party card stock. I stamped the Butterfly from the Touch of Ink stamp set with Black Stazon Ink. Using the Blender Pen I added Gorgeous Grape ink to the image. I trimmed around the image, mounted on Basic Black card stock (trimmed this to)and then added to card front using dimensionals. I add sentiment for the Heal your Heart stamp set and a couple of resin dots to finish it off.

Week of Color – Day 2 Blender Pens Read More »

Week Of Color- Day 1

It’s all about Spritz. And no I don’t mean the Christmas Cookies, although they are super yummy. This is about the Color Technique Spritzing. Today’s Project uses the Stampin’ Spritzers filled with water or alcohol. Each day from February 10th through February 16th I will be doing a video or facebook live on how to bring color into your paper crafting.

To further Sale-a-Brate I am offering a Ordering special uniquely through my Online Store. In addition to receiving a Free Sale-a-Bration product with a $50 minimum purchase I will be treating you to a little sumthing sumthing for your crafting area.

Check out this adorable and totally functional adhesive holder for your Crafting area. You won’t have to worry about those dimensionals hiding on you any more!

7 DAY ORDERING SPECIAL!

Receive an exclusive tutorial/video, directions and the supplies for this awesome cute and so very useful Adhesive Holder project! (check it out below) You will ALSO receive two of the adhesives to go inside for FREE! A package of Dimensionals and a brand new Tombow glue! All for FREE with your min. of a $50.00 order placed with me! (This special ends February 16th and you must use the hostess code: MZAFMVZW)

Week of Color: Day 1 Spritzing

Here is a quick and basic card the focus is really on the Spritzing Technique. I may two layers of Spritzed color. the first layer in Mango Medley

Week Of Color- Day 1 Read More »

Hump Day Lunch Break: Facebook Live 2/3/21

Today’s Hump Day Lunch Break was a sweet little gift box with an attached 3 x 3 card, This is such a fun, quick and cute project that can be used to give cards or a little gift. This project features the Hey Birthday Chick bundle that was just made available on Feb. 2, 2021. You can check out the facebook live on my business page click here. Please like my facebook page and share it with others. To be notified of any time I go live make sure to join the My Stamp Studio Group.

Once I made the first gift box, I knew I have to make more. Check out the next pictures to see how I stamped the inside of the card.

I used the Mini Pizza boxes to create these sweet little boxes. I put strips of card stock around the sides to tie it all together. I created the card by cutting a piece of thick basic white cardstock to be 6″ x 3″ I scored it in half to make a 3″ x 3″ card base. I stamped two sentiments and balloons using the Hey Birthday Chick stamp set. I stamped and cut the little chick and the balloons using the coordinating Birthday Chick Dies. I then added a piece of designer paper that measured 3 1/4″ x 3 1/4″ and adhered this to a piece of colored cardstock that measures 3 3/8″ x 3 3/8″. I adhered this to the card base making sure that the top of the layered DSP/Cardstock was even with the scored side of the basic white card base. This allows you to open the card easily. To make the card front I again used the Hey Birthday Chick Stamp set and Birthday Chick dies. I think this turned out pretty cute.

Hump Day Lunch Break: Facebook Live 2/3/21 Read More »