April 2021

How to Shop with Me in my Online Store

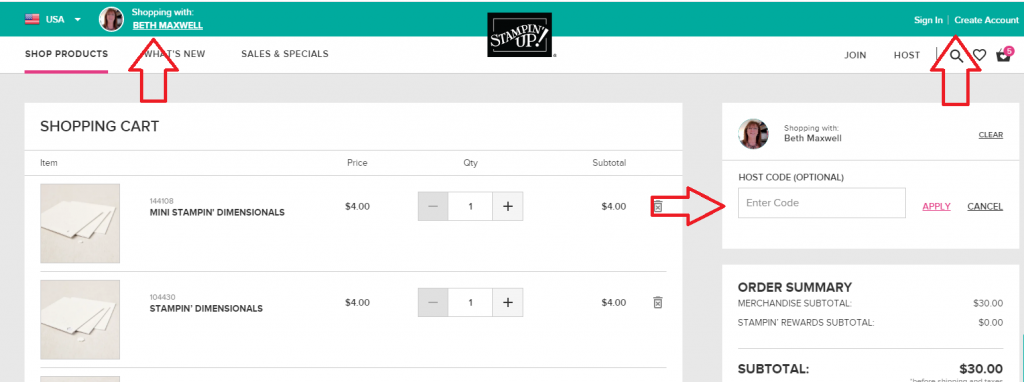
Here is a quick little “how to” shop with me guide. When you go to my Online Store (click HERE). The link or product image you click on will take you to my Online Store. Here is how you know you are shopping with me:

  • On the upper right of the screen you will see a picture of me and my name
  • If you have not shopped with me before, you will need to Create Account. When you do this make sure to enter your name, address and email. Indicate that you would like to be contacted and on my mailing list. This will give me the ability to see your information so I can send you hand stamped cards and weekly emails on specials, classes, upcoming event and on occasion free tutorial.
  • If you are shopping for an ordering special, make sure you have the host code entered.
  • Just before you Checkout, make sure you see my photo and the host code.
  • That’s it.
  • If for any reason you need assistance with your order, I am happy to help you place it or answer any question you may have.
  • If your order is over $150…don’t use a host code. I want to make sure you receive the host rewards for placing a larger order.

How to Shop with Me in my Online Store Read More »

Snailed It Again on Friday Night

I felt bad that I had to miss my facebook live with everyone last night. I did put a video out there so you did have something to see, but I missed connecting with all of you. So, tonight I did a little extra live with a bonus. A Free tutorial to tonight’s card. I wanted to say Thanks for being there for me and I wanted to give you all a little something back. Here is the front of the card. I had so much fun making this with all of you. And you know that these colors make me happy. (But, I think I may have a new favorite color…Stampin’ Up!s new 2021-2023 In Colors are fabulous I must say. Make sure to check out my Catalog Launch Party Friday May7,2021 at 7pm central.

Ok back to this card. It look like it takes a lot of time to make but really it does not. My style of stamping is Simple To Stylish with out taking hours to create. Feel free to copy and make this same card or use it for inspiration and tweak it with the supplies you have on hand. Jump on over to my Facebook business page to check out the LIVE REPLAY. While you are there, take a moment to LIKE my page and join the MY STAMP STUDIO GROUP. It is a public group and everyone is welcome. I go live every Thursday night and if I am not live, I will have a video posted for you.

Here is the inside of the card, I used the small Snail and cut out with the die cut. notice that the You’ve Got Mail sentiment is not there. That’s right the die will just cut the snail for you! Howe awesome is that. I added the envelope on a whim as I wanted to share some of the other things in the Dies. There are 13 dies that coordinate and complement this stamp set. I used various blends to color the images but you could use markers, ink pads with blender pens, watercolor pencils… As promised, here is the Free HELLO SNAIL CARD PDF.

The supplied used for this card are listed below. Note you do not have to purchase the Stamp Set and Dies as a Bundle, you can just order the Stamp set itself it is item 154472 You can click on any of my images to go to my Online Store. If you don’t already have a demonstrator, I would love to earn your business. Sign Up for my Email List to receive weekly emails on specials, classes, events and Stampin’ Up Promotions.

Snailed It Again on Friday Night Read More »

Snailed It!

Thursday Nights Facebook video featured the Stampin’ Up! Snailed It Stamp Set. I do have to admit, it is such an adorable set. When I first saw it in the January – June 2021 Mini I said, Nope! not gonna do it. I just don’t need another cutesy set. Oh, but of course, I fell in love with all the cards I was seeing and actually participated in a stamping event that featured this set. Yup, just had to have it. I have been wanting to do a class with is since I got it. Time is running short though as it i only available until the end of June. Ok, I will do a class…Watch for it in June! Just check out these adorable cards we made.

The first card was a fun fold card that I originally featured in my Hump Day Lunch Break Live on Wednesday, April 21,2021. That card featured the Timeless Tulips stamp set and I used it to make a Mother’s Day Card. You can see more details below.

This fun fold is so easy to make I just had to share it again using the Snailed it Stamp set. I wanted to make this a quick and easy card so I used the Designer Paper to do all the work for me. I just love that Stampin’ Up! has coordinating colors, designer paper and stamp sets. It saves so much time knowing that all the products will work together. This card is unique in that it does not have the standard 5 1/2″ 4 1/4″ card base that opens. It actually has a front flap that opens and displays a message right underneath your focal point. You can watch the video on my Facebook Business page: My Stamp Studio. I’d love if you stop by and like my page. Leave a comment letting me know you are watching the replay and what you think of the Fun Fold. While you are there, you are welcome to join the MY STAMP STUDIO GROUP so you can see all the up and coming lives, shares, projects. I would love to see what you come up with using the supplies you have on hand! Here is the link to the VIDEO

I needed a card for a Birthday I missed. I know it’s hard to beieve that with all the cards I make, I missed sending one out. I need to come up with a better way to remember whose Birthdays and Anniversaries are all coming up…..

I paired the card up with the Itty Bitty Birthday Stamp set, which I am so sad to share that it is retiring and will no longer be available after May 3,2021. If you are looking for a versatile Birthday stamp set I highly recommend it. If you are interested in any of the supplies I used to make these cards, please stop in to my Online Store by clicking HERE or any of the supplies listed below. (note that you can purchase the Stamp Set with or without the Dies)

The second card that was made in the video is more o a feminine card and it is darn cute! This time I switch up the colors and used Blushing Bride and Real Red along with Pool Party. Again, the Designer paper does all the work to make this card adorable. I added a few Resin heart embellishments and a little Blushing Bride Bakers twine to tie is all together. (no pun intended but it does work). Notice the subtle mushroom stamped in the background with Blushing Bride. The Color on Color technique gives the card a bit more depth and adding some dimensionals can really give your card a pop (yes, that was an intended pun).

Snailed It! Read More »

Hump Day Lunch Break Live: Dragonfly Card

Today’s Hump Day Live on Facebook featured a fun and easy card using the Dragonfly Garden Bundle. I was inspired by a card that Wendy Lee has made but wanted to show how you can use ink directly onyour embossing folder to give an alternative “stamped” image. I really like the clean and simple look of this card. I used Daffodil Delight and Misty Moonlight and let the white cardstock enhance the colors and images. If you like this Stamp Set and Punch Bundle as much as I do, you will want to register for the Dragonfly Garden Class to Go. You can see all the details on the Classes and Tutorials page

Check out the Video Here on Facebook. Make Sure to like and follow my page. Also, join the My Stamp Studio Group so we you be notified of all the upcoming event.

Measurements:

  • Thick Basic White: 8 1/2″ x 51/2″ (score at 4 1/4″
  • Basic White: 5 1/4″ x 4″
  • scrap of white for the Dragonfly

Hump Day Lunch Break Live: Dragonfly Card Read More »

Live at 6:45: In Bloom Online Class – April 1, 2021

Each Week I do a facebook live to feature a different product and design projects using those items and then do a Facebook Live. This week I’ve chosen the In Bloom Bundle. This was a really popular bundle during Sale-a-bration when Stampin’ Up offered coordinating papers. But I wanted to show you ways to use this set without the designer paper. (Ok I used a little bit)!

If you have never joined my Facebook live at My Stamp Studio, I go live every Thursday night at 6:45pm central, (If I am not live, there will be a video), with at lease three projects. Everyone is Welcome to join. Hop over to my Page: My Stamp Studio Join the My Stamp Studio Group

If you can not make it to the live, I will be posting the recordings here and on My YouTube channel.


This first card started with just using stamps, ok I slipped in a die cut from the Stitched So Sweetly Dies, I couldn’t help myself. My base is Granny Apple Green. The next layer is Basic Gray- it needed a little something so I grabbed the Textured Essential Stamp set and stamped using Basic Gray ink. The flowers were stamped with our Stampin’ Up! bright colors: Coastal Cabana, Granny Apple Green and Magenta Madness. I added a splash of sheer pool party ribbon and TADA!

The second card I focused more on the Pierced Blooms dies and kept the card pretty, clean and somewhat monochromatic. I had to add a little splash of color and of course add designer paper for the envelope flap. The Purple Posy cardstock is no longer orderable so is not listed below.

This third card, is a fun fold. I love making fun fold cards. I was inspired by Sherry Roth that share this card. I changed it up by using switching around the card layer colors and using the Old World Embossing folder. The Old World embossing folder is retiring along with the Rococo Rose In color.

***Remember, if you put in an order ($35 minimum) by  April 5th, 2021 at midnight, using Host Code ZFNRQGPH……. I’ll send you all three make and takes for free.

You will need the stamps, ink and adhesive

But, your order MUST be in by Monday at midnight!!

Live at 6:45: In Bloom Online Class – April 1, 2021 Read More »