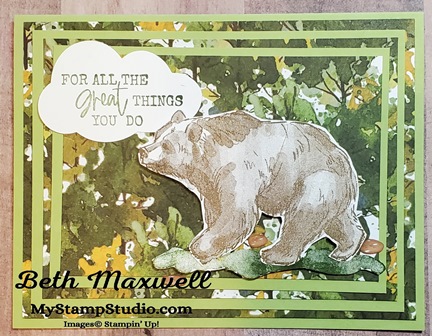
It’s Hump Day and you know what that means…Hump Day Lunch Break Live. Today we made a Triple Layer card using Designer Series Paper. I share two ways to make the triple layer cards. Learn some Paper saving techniques and what to do if you don’t have Dies and a Die Cutting Machine. Video and recipe are below.
We can never have to many masculine card ideas. This Triple Layer technique can be used with whatever Stamp Sets and Designer Papers you have in your Craft room.
Well Stampin’ Up! has done it again! They have come up with another awesome product collection. This is special promotion Stampin’ Up! is offering from March 1, 2022 to May 2, 2022.
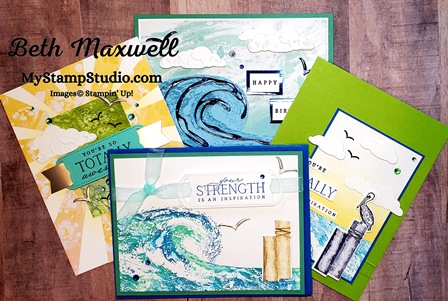
As many of you already know I have an affinity for Aquatic and Sea Life stamp sets. Stampin’ Up! totally stepped it up by bringing the new Waves of the Ocean product collection. OMG, I just LOVE it. In fact I love it so much that I have created 8 cards already using these products and I cannot wait to share them with you.
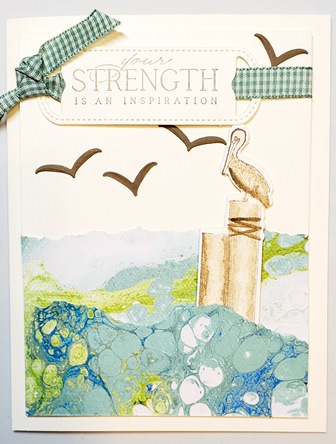
Waves of Inspiration Card- Scroll down to watch YouTube Video
To create this inspirational card you will need the products from the Waves of the Ocean. Click here for a free PDF Card recipe: Waves of inspiration Card Recipe
Let me start by showing you all the AMAZING products in this collection, these are a must have! But I want to warn you they are while supplies last. Stampin’ Up! has created an amazing collection for you with exclusive limited time only products. The Designer paper, Foil specialty paper and Rhinestone Waves Basic Jewels are while supplies last
If you purchase the Waves of the Ocean Collection in my online store using the March Host code, I will send you a 4 card card kit with all the precut cardstock, envelopes and PDF as a Thank you from me. And if you are part of the Ink Trails team, I share this with you for free.
Don’t you just love Spring? All the flowers are popping up from their long winter slumber, the air gets a little warmer. I am itching to get going on my gardens and yard. But, it’s still a tad bit chilly here in Wisconsin to start that. Oh well, I guess I will just have to STAMP!
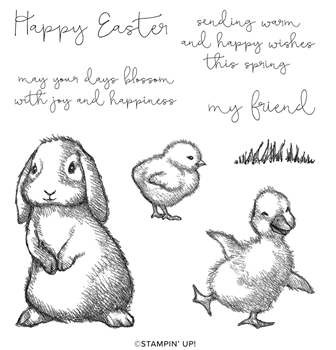
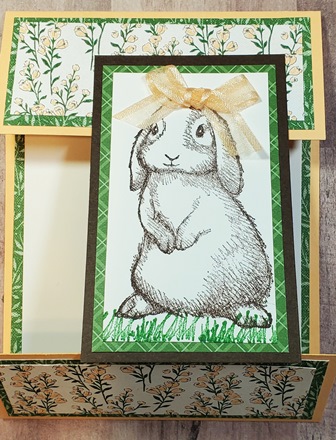
Today’s card is a Fun Fold using the EASTER FRIENDS stamp set by Stampin’ Up! and can be purchased in my Online store.
Here is the card made. Isn’t just the cutest thing? You can find all the Supplies and color photo in this free download. Easter Friends Recipe
The measurements are
Pale Papaya Cardstock: 4 -1/4″ x 9-1/4″ (sore at 1-7/8 and 7-3/8″
Heart & Home Designer Paper pattern 1: 4″ x 5-1/4″, 4″ x 1-5/8″ (2 pieces)
Heart & Home Designer Paper pattern 2: 3-3/4″ x 1-3/8″ (2 pieces)
Regals Designer Paper: 2-1/4″ x 3-3/4″
Early Espresso cardstock: 2-1/2″ x 4″
Basic White cardstock: 3-3/4″ x 5″, 2″ x 3-1/2″
You can watch the Facebook Live Replay Here: https://fb.watch/bNE4xJcErc/
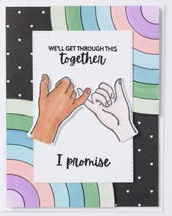
There are so many cards we can make using the All Together Collection. Here is another card that the Stampin’ Up! Home office gave to us as demonstrators to share with all of you. This is one of the many reasons I love Stampin’ Up! We have a library of resources that we have access to that provide us inspiration for our creativity and yours.
We’ll Get Through this Together Card
STAMPS 158634 – Here Together Cling Stamp Set (English) PAPER 159276 – Basic White 8-1/2″ X 11″ Cardstock, 160039 – All Together 6″ X 6″ Designer Series Paper INK 102283 – Versamark Pad, 132708 – Tuxedo Black Memento Ink Pad, 154830 – Balmy Blue Stampin’ Blends Combo Pack, 154884 – Flirty Flamingo Stampin’ Blends Combo Pack, 154902 – Soft Sea Foam Stampin’ Blends Combo Pack, 155518 – Fresh Freesia Stampin’ Blends Combo Pack, 155521, Soft Succulent Stampin’ Blends Combo Pack, 159462 – Stampin’ Blends Medium Combo, 159465 -Stampin’ Blends Light Combo Pack TOOLS 104430 – Stampin’ Dimensionals, 151820 – Stitched Rectangle Dies, 159278 – Here For You Dies, EMBELLISHMENTS 155554 – Basics Embossing Powders, 129053 Heat Tool
Clicking on any of the Add to Cart images will take you directly to my Online Store. you can add or remove items from your cart there.
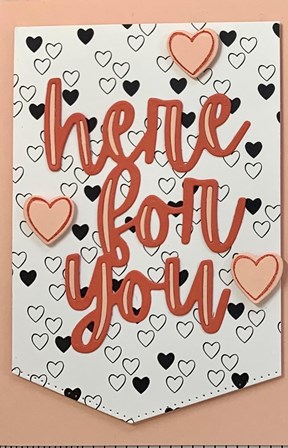
Stampin’ Up! has some amazing artists that create cards for use to showcase products. I love being able to share these with you. This card is actually a Note card using the Basic White Note Cards and Envelopes.
All Together Here for You Card
STAMPS 158634 – Here Together Cling Stamp Set (English) PAPER 122925 – Calypso Coral 8-1/2″ X 11″ Cardstock, 146985 – Petal Pink 8-1/2″ X 11″ Cardstock, 160039, All Together 6″ X 6″ Designer Series Paper, 159232 Basic White Notecard & Envelopes INK 147101 – Calypso Coral Classic Stampin’ Pad TOOLS 104430 – Stampin’ Dimensionals, 110755 – Multipurpose Liquid Glue, 155558 – Basic Borders Dies, 159278 – Here For You Dies
Here is one of the cards Stampin’ Up! has created to showcase the All Together collection. What is create about this card is you don’t have to have the entire collection to make it. You can swap out the designer paper with what you have and if you have dies and a die cutting machine you can easily select a different label. Or, if you don’t have dies create your own label using card stock. Below the Photo is a list of all the supplies used and links to purchase in my Online Store if you are interested in ordering the products. Hope you enjoy this week’s card.
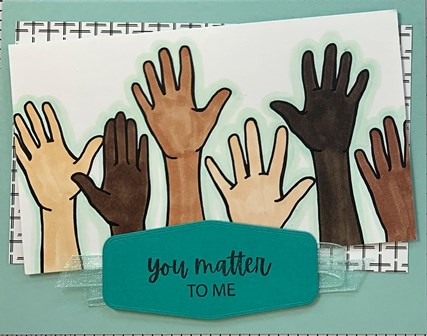
You Matter to Me card
STAMPS 158634 – Here Together Cling Stamp Set (English) PAPER 122924 – Pool Party 8-1/2″ X 11″ Cardstock, 131197 – Bermuda Bay 8-1/2″ X 11″ Cardstock, 159276 -Basic White 8-1/2″ X 11″ Cardstock, 160039 – All Together 6″ X 6″ (15.2 X 15.2 Cm) Designer Series Paper INK 132708 – Tuxedo Black Memento Ink Pad, 154894 – Pool Party Stampin’ Blends Combo Pack, 158152 – Stampin’ Blends Deep Combo Pack, 159461 – Stampin’ Blends Medium Deep Combo, 159462 – Stampin’ Blends Medium Combo, 159463 – Stampin’ Blends Medium Light Combo Pack, 159465 – Stampin’ Blends Light Combo Pack TOOLS 104430 – Stampin’ Dimensionals, 152813 – Stampin’ Seal, 152886 – Tasteful Labels Dies EMBELLISHMENTS 152462 – Pool Party 3/8″ (1 Cm) Sheer Ribbon


Recent Comments