IT’S PARTY TIME! JOIN THE NEW BIRTHDAY CARD CLASS SERIES TODAY!
CELEBRATE WITH STYLE! GET YOUR HANDS ON OUR EXCITING BIRTHDAY CARD CLASS SERIES!
Birthdays are the perfect occasion to show your loved ones how much you care! And what better way to do that than by creating a handmade card? Our new Birthday Card Class Series is here and it’s filled with fun, creativity, and lots of celebration! With every qualifying order, you’ll get a FREE class kit that includes everything you need to get started.* From colorful cardstock to fun embellishments, we’ve got you covered! So come join us and let’s make some unforgettable memories! This is an Online class series- Facebook Lives that will be copied up to YouTube. Each Class will feature 4 very fun cards. You will receive the Class Kit for free with a qualified order using that week’s host code.
Our week Christmas Card Class featured the exclusive Framed & Festive Stamp set which is available for a limited time and while supplies last. This is an awesome Holiday Greeting stamp set that I wanted to share with all of you. I love the easy and fun cards in this Online class.
This card class is free when you place a $35 (retail) order in my Stampin’ Up! Online Store using Host Code: C42B4B9M If you place a $50 retail order you will receive an added embellishment as part of your kit! Watch the video for details!
The card kit includes all the Precut, Scored, Diecut Card stock to make 6 cards (2 of each design). This also includes envelopes and designer papers. You would need the Frame & Festive Stamp set and Framed Florets dies as well as ink and adhesive to complete the cards as designed. However, you can use other stamp sets and die cut (or punched shapes) that you have in your stash and change up the cards. Watch the video below to see what is in each of the card kits. For a list of products used – check out the Framed & Festive pdf
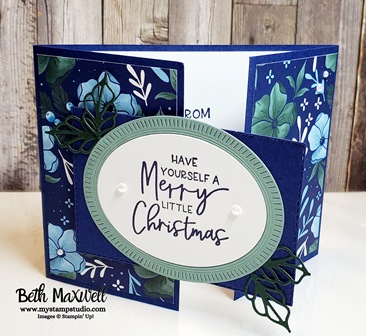
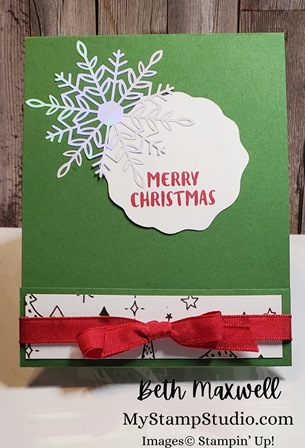
This fun fold card features the beautiful Fitting Florets Designer Paper, the Framed & Festive Stamp set and the coordinating Framed Florets dies. On the inside you will see one of the images from the Framed Florets Stamp Set.
Jolly Snowman Card
This fun card uses the Penguin Builder punch that many of you already have to create and adorable little snowman. In the Class, we actually created the card with a Snowman and Penguin. Make sure to check it out and subscribe to my YouTube channel for more fun crafting videos
Peace and Joy Card
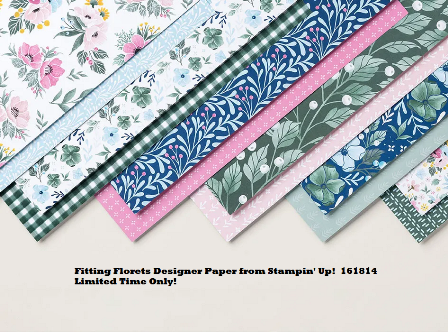
Our third card in the class features the Fitting Florets Designer paper and the Framed & Festive Stamp set as well as the Framed Floret dies. The Stamp set and Designer paper is only while supplies last of January 4, 2023 whichever comes first. Don’t miss out on getting this beautiful paper!
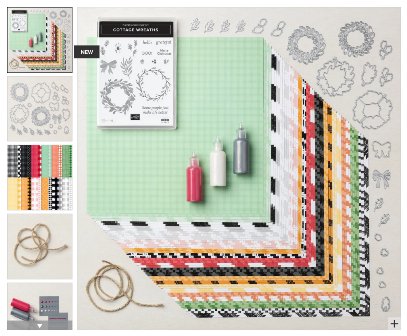
Fitting Florets Designer Paper
Balmy Blue, Blushing Bride, Crushed Curry, Evening Evergreen, Night of Navy, Polished Pink, Soft Succulent
Scroll down for details on how to get this class kit for free!
The Christmas Card Class Series has kicked off! I just love the Holiday season! While I am not quite ready to say good by to summer, I know that the Holidays will be here before I know if. This year, I want to be well prepared and start my Holiday projects now so come Thanksgiving I am ready to get things mailed. Yes I know that is a well thought out plan- now to make sure I implement it!
It’s funny as a little kid, I was frightened of dogs, but now I just love them. I am a proud doggie mom. yup our little man Cooper (well he is 70 lbs of little) is a joy in our lives. Yes, he can be a handful, but I wouldn’t trade him for the world. My hubby calls him a Momma’s boy. Although he is excited for any family member to walk in the door. And well, he can not hold his licker. so if you love doggie smooches he is the pup to visit. I’ll find some pictures to share later on.
The card kit contains all the precut cardstock, designer paper, embellishments, die cut and embossed pieces and envelopes to make 6 cards (2 of each design). A color pdf tutorial with measurements, directions and supplies will be emailed to you the day the kit is shipped out.
This kit does not contain: Stamps, Inks, Adhesive or the punched Scotties, you will need to purchase the bundle or use Stamps and punches you have in your stash. The inks I have used are Real Red, Versamark and Stazon Jet Black.
The Week 1 Class Kit will only be available for orders placed from August 29, 2022- September 6, 2022 and is only available as an exclusive from me with your purchase in my Online store.
BUT WAIT, there’s more. Place a $50 order (before s/h and tax) and I will include a package of Wonderful Snowflakes in your class kit!
Anyways, on to our cards…
here is the class video, feel free to watch or scroll down to the card photos.
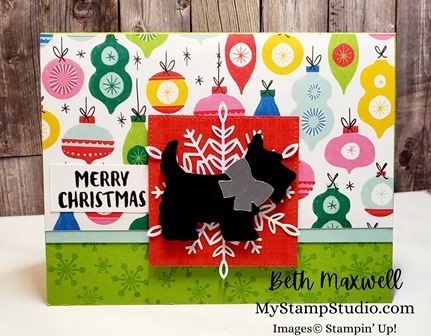
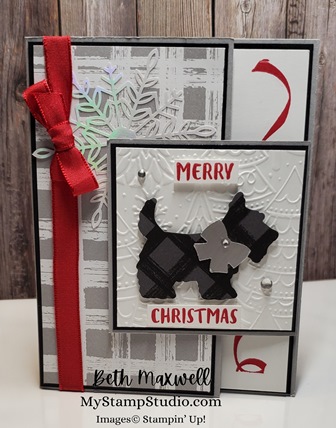
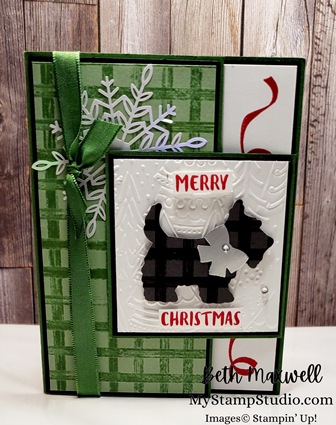
Festive Scottie Card
The first card features the Celebrate Everything Designer Paper. But you could use ANY designer paper you have and make it any theme. Did you notice the Wonderful Snowflake accent on the card? It is an iridescent snowflake and can be used on all sorts of cards. In fact, I used them on all 3 cards. On this card I used both the punch and the stamped Scottie image. When I stamped the Scottie on the inside, I used Stazon Jet Black ink. Watch the video for details and tips on using Stazon Ink and cleaning tips.
Festive Scottie Card
Festive Scottie Card inside
Supplies used (click on picture to go to my Online store)
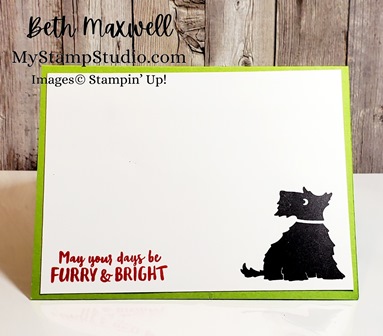
Furry and Bright Holiday Card
Our second card is a bit of a fun fold. Very similar to the Book binding or Matchbook Style cards you may have seen. I was inspired by Lisa McGrew that I has been in a card swap with. I once again used the Celebrate Everything Designer Paper. I also used the Whimsical Woodland 3D embossing folder from the July – December Mini Catalog or as I refer to is as the Holiday Mini Catalog from Stampin’ Up! Try to say Whimsical Woodland 3D embossing folder really fast. It’s almost a tongue twister. I finished off the card with Red Rhinestones and Real Red Ribbon. I also decided I wanted the inside to be different from most cards. Instead of using a piece of Basic White layer, I punched out a Decorative circle, stamped my sentiment in Real Red then added on of the Wonderful Snowflakes. For his collar, I used an Real Red marker to color it in.
Furry And Bright Card
Furry and Bright inside
Supplies used:
Christmas Scottie Fun Flap Card
Last but definitely not least… a Fun Flap card. I received this card in a swap as well, but I lost the person’s information that created it so I can not give her credit, I do apologize. I changed it up by adding a Wonderful Snowflake, using the Whimsical Woodland 3d Embossing folder and adding silver foil and Basic Rhinestone jewels. This card features the Gingham Cottage Designer paper that coordinates with the Gingham Cottage Suite found in the July – December Mini Catalog on page 58-59.
Gingham Cottage Suite from Stampin’ Up! click on the picture above to see the details in my Online Store
I also tried out using some different colors…check out the Garden Green Version
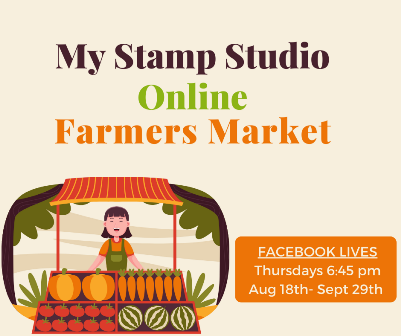
I am running a new class series from August 18, 2022- Sept 29, 2022. It is my Online Farmers Market. This class series is 7 weeks and will be Face Book live videos that will also be uploaded to YouTube.
What is so speical about this class series? I am sharing 2-3 projects each week that you can find, make , sell at a Craft Fair or Farmers Market. I will share with you how to make each of the projects, what I used to make them and give you some helpful tips on making multiple ones.
I am super excited about this class series there are so many fun projects to make. I hope you will join me each week to see what you can make for the upcoming craft season.
If you are interested in any of the products used, you can purchase them in my Online store using the links in each weeks video post.
For those of you on my Email subscription list, each week I will send out project sheets for each of the projects with picture, supplies used and measurements to make the projects.
Not subscribed to my Email? you can sign up right here
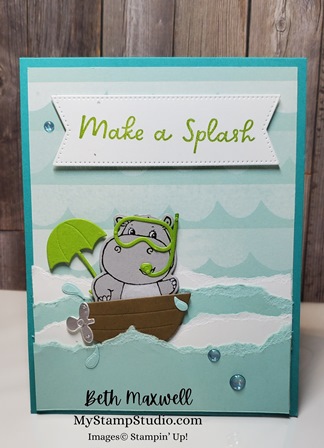
This set is to cute to pass up. Our third Card features the Hippest Hippos and Hippo Dies form the Sale-a-Bration Catalog. I also added in the Sunny splash stamp set for some added summer fun! If you don’t have a demonstrator and would like a Sale-a-Bration or Holiday Mini catalog- head over to my contacts page and message me you would like a catalog! I would love to have the opportunity to earn your business and friendship. Now on the to card!
The dies that coordinate with this stamp set are AMAZING. There are 2 hippo dies one for each Hippo in the stamp set, an umbrella, Snorkel, Dive mask (or sunglasses- your choice), a boat, a propeller, and so much more! I decided to use the Celebrate Everything Designer Paper. You can get 48 sheets of 12 X 12 designer papers and they are soooooo fun! How can you get the paper? Well when you host a party, place an order, gather orders with friends and your orders total over $150, you can get this with your host rewards. That is the only way! I can’t even buy it. you earn i! And now is the time with Stampin Up giving you free products with every $50 and $100 order as well as host rewards> you can really stock up for the holiday season!
Check out the Video on my YouTube channel and make sure to subscribe so you don’t miss future videos. I have many more coming!
All supplies used in Today’s card can be found in my Online Store while supplies last- just click on any of the images below.
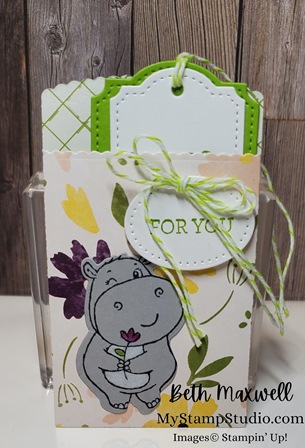
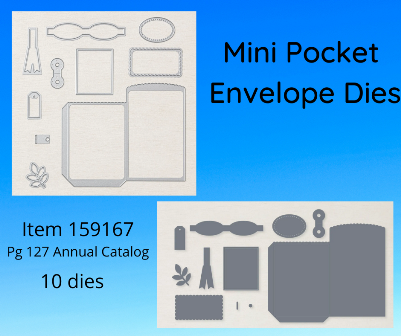
We are changing in up a bit here and making something other than a card. The Mini Pocket Envelope dies are a perfect way to make Gift card holders quick and easy. You can also use this as a little party favor. Watch the video below to find out!
Isn’t this the sweetest little gift card holder and yes a gift card will actually fit in it. This was so fast to make using the Mini Pocket Envelope Dies.
Check out the project video and learn some tips and some fun things along the way!
All Supplies are available while they last in my Online Store- click on any of the products below


Recent Comments