My Stamp Studio

Beth Maxwell, Independent Stampin' Up! demonstrator

Page 26 of 30

Snailed It!

Thursday Nights Facebook video featured the Stampin’ Up! Snailed It Stamp Set. I do have to admit, it is such an adorable set. When I first saw it in the January – June 2021 Mini I said, Nope! not gonna do it. I just don’t need another cutesy set. Oh, but of course, I fell in love with all the cards I was seeing and actually participated in a stamping event that featured this set. Yup, just had to have it. I have been wanting to do a class with is since I got it. Time is running short though as it i only available until the end of June. Ok, I will do a class…Watch for it in June! Just check out these adorable cards we made.

The first card was a fun fold card that I originally featured in my Hump Day Lunch Break Live on Wednesday, April 21,2021. That card featured the Timeless Tulips stamp set and I used it to make a Mother’s Day Card. You can see more details below.

This fun fold is so easy to make I just had to share it again using the Snailed it Stamp set. I wanted to make this a quick and easy card so I used the Designer Paper to do all the work for me. I just love that Stampin’ Up! has coordinating colors, designer paper and stamp sets. It saves so much time knowing that all the products will work together. This card is unique in that it does not have the standard 5 1/2″ 4 1/4″ card base that opens. It actually has a front flap that opens and displays a message right underneath your focal point. You can watch the video on my Facebook Business page: My Stamp Studio. I’d love if you stop by and like my page. Leave a comment letting me know you are watching the replay and what you think of the Fun Fold. While you are there, you are welcome to join the MY STAMP STUDIO GROUP so you can see all the up and coming lives, shares, projects. I would love to see what you come up with using the supplies you have on hand! Here is the link to the VIDEO

I needed a card for a Birthday I missed. I know it’s hard to beieve that with all the cards I make, I missed sending one out. I need to come up with a better way to remember whose Birthdays and Anniversaries are all coming up…..

I paired the card up with the Itty Bitty Birthday Stamp set, which I am so sad to share that it is retiring and will no longer be available after May 3,2021. If you are looking for a versatile Birthday stamp set I highly recommend it. If you are interested in any of the supplies I used to make these cards, please stop in to my Online Store by clicking HERE or any of the supplies listed below. (note that you can purchase the Stamp Set with or without the Dies)

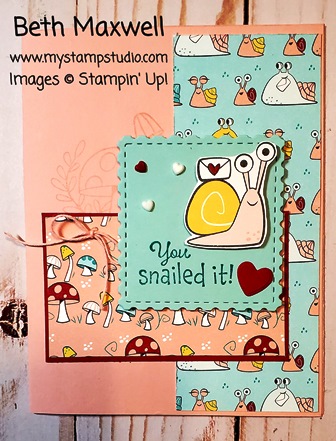
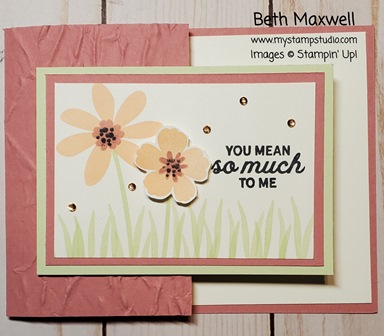
The second card that was made in the video is more o a feminine card and it is darn cute! This time I switch up the colors and used Blushing Bride and Real Red along with Pool Party. Again, the Designer paper does all the work to make this card adorable. I added a few Resin heart embellishments and a little Blushing Bride Bakers twine to tie is all together. (no pun intended but it does work). Notice the subtle mushroom stamped in the background with Blushing Bride. The Color on Color technique gives the card a bit more depth and adding some dimensionals can really give your card a pop (yes, that was an intended pun).

Hump Day Lunch Break Live: Dragonfly Card

Today’s Hump Day Live on Facebook featured a fun and easy card using the Dragonfly Garden Bundle. I was inspired by a card that Wendy Lee has made but wanted to show how you can use ink directly onyour embossing folder to give an alternative “stamped” image. I really like the clean and simple look of this card. I used Daffodil Delight and Misty Moonlight and let the white cardstock enhance the colors and images. If you like this Stamp Set and Punch Bundle as much as I do, you will want to register for the Dragonfly Garden Class to Go. You can see all the details on the Classes and Tutorials page

Check out the Video Here on Facebook. Make Sure to like and follow my page. Also, join the My Stamp Studio Group so we you be notified of all the upcoming event.

Measurements:

  • Thick Basic White: 8 1/2″ x 51/2″ (score at 4 1/4″
  • Basic White: 5 1/4″ x 4″
  • scrap of white for the Dragonfly

Live at 6:45: In Bloom Online Class – April 1, 2021

Each Week I do a facebook live to feature a different product and design projects using those items and then do a Facebook Live. This week I’ve chosen the In Bloom Bundle. This was a really popular bundle during Sale-a-bration when Stampin’ Up offered coordinating papers. But I wanted to show you ways to use this set without the designer paper. (Ok I used a little bit)!

If you have never joined my Facebook live at My Stamp Studio, I go live every Thursday night at 6:45pm central, (If I am not live, there will be a video), with at lease three projects. Everyone is Welcome to join. Hop over to my Page: My Stamp Studio Join the My Stamp Studio Group

If you can not make it to the live, I will be posting the recordings here and on My YouTube channel.


This first card started with just using stamps, ok I slipped in a die cut from the Stitched So Sweetly Dies, I couldn’t help myself. My base is Granny Apple Green. The next layer is Basic Gray- it needed a little something so I grabbed the Textured Essential Stamp set and stamped using Basic Gray ink. The flowers were stamped with our Stampin’ Up! bright colors: Coastal Cabana, Granny Apple Green and Magenta Madness. I added a splash of sheer pool party ribbon and TADA!

The second card I focused more on the Pierced Blooms dies and kept the card pretty, clean and somewhat monochromatic. I had to add a little splash of color and of course add designer paper for the envelope flap. The Purple Posy cardstock is no longer orderable so is not listed below.

This third card, is a fun fold. I love making fun fold cards. I was inspired by Sherry Roth that share this card. I changed it up by using switching around the card layer colors and using the Old World Embossing folder. The Old World embossing folder is retiring along with the Rococo Rose In color.

***Remember, if you put in an order ($35 minimum) by  April 5th, 2021 at midnight, using Host Code ZFNRQGPH……. I’ll send you all three make and takes for free.

You will need the stamps, ink and adhesive

But, your order MUST be in by Monday at midnight!!

Saying Good Bye is always hard…

Each year we need to part with some amazing Stampin’ Up! product. This year is no different. But, what is different this year is that there and some SUPER AWESOME deals to be had. If you had your eye on something or need to get the 2019-2020 In Color card stock or ink refills to go with your Ink pads, make sure to order right away. Everything on the Retiring list is only WHILE SUPPLIES LAST, and I can tell you supplies will not last long. The deadline for orders is May 3, 2021. I am offering a special for those placing an $50 or more Online Order (before shipping/tax), I will send you a special Thank you. You will need to use Host code 2MSZ34YR to place your order. I will be closing this code out on April 10th. Click HERE to get to my online store.

Retiring List PDF

Butterfly Bouquet

This is not just another old butterfly stamp set. Oh it is a whole lot more… Bring in the beauty of nature with the artistic designs of the Butterfly Brilliance Bundle and coordinating designer series paper, along with textured specialty paper that will put a pop of brilliance on every project. This is available only during this special event: MARCH 2 – MAY 3, 2021 .

This week on my Facebook Lives at MY STAMP STUDIO and in my Blog Posts, on the HOME page you will see various cards and projects made with the phenomenal suite of products. You can order it all or just some of the suite. It’s totally up to you!

Week of Color Day 2- Stampin’ fun with Sunburst Cards

On Day 2 of the Week of Color we focused on using Blender Pens to color our images. In addition I shared this Sunburst technique which is fun way to use up your scraps of designer paper.

To make this card, you will start with a card base which measures 8 1/2″ x 5 1/2″. I used Just Jade in the card above. Next create your first layer of card stock which measures 5 1/4″ x 4 (Cinnamon Cider card stock). To create your Sunburst you will need to start with a peice of white card stock measuring 5″ x 3 3/4″ . Next you will cut two 1 1/2″ x 4″ strips from 3 different designer paper patterns. Cut each of these pieces in half diagonally. You will have 12 triangles. Lay these out on the white card stock in the order you would like to have the paper placed. Once you have determined that you will adhere the middle triangle to the white card stock, I recommend using Tombow multipurpose liquid glue. Make sure that the designer paper covers all the white card stock on the top and two sides. You will have some paper hanging off the edges, that is to be expected. Once you have the enter piece of the white card stock covered you can trim the excess off. Adhere this layer to your 5 1/4″ x 4″ layer of Cinnamon cider card stock. Then add your punches pieces and image to the front of your card. To watch the facebook video click HERE.

This is the inside of the card. I had a lot of fun using the Dies that coordinate with the Stamp set. They are so stinkin’ cute!!!

« Older posts Newer posts »

© 2026 My Stamp Studio

Theme by Anders NorenUp ↑