My Stamp Studio

Beth Maxwell, Independent Stampin' Up! demonstrator

Page 27 of 30

Week of Color – Day 2 Blender Pens

What are blender pens and how do they work? How do I use them in in paper crafting projects? In Day 2 Week of Color episode, watch how you can use Blender pens to make some adorable cards.

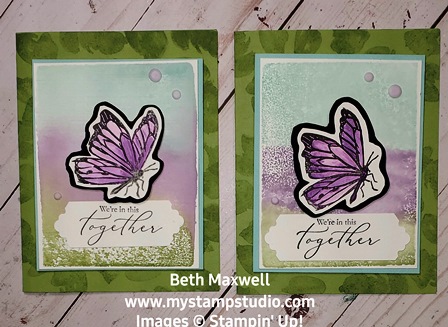
This card was a continuation of Day 1- Spritzing. I used 3 different ink pads and alcohol in my Spritzer to create the back ground and then focused in on the Blender Pen technique on the Butterfly from the Touch of Ink Sale-a-bration stamp set. You can get this stamp set for free when you make a $100 (US) purchase in my ONLINE STORE

You can watch the face book live post here: My Stamp Studio Day 2 Blender Pens Video . Blender Pens are dual-tipped pens filled with specialized solution for easier blending. When used with Stazon Ink and Thick white card stock or Shimmery White card stock you get a extended color palette from just one color of ink. It gives you the option of a gradient color scheme or a watercolor effect.

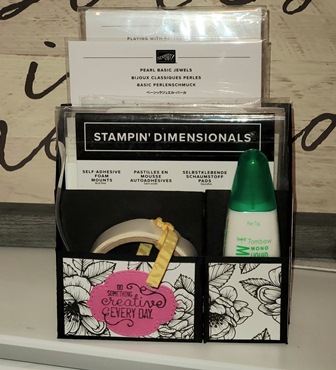
Supply List ( with product link to my Online Store)

Dimensions of the materials used in the card:

  • Pear Pizzazz Card stock: 8 1/2″ x 5 1/2″ score at 4 1/4″
  • Thick Basic White card stock: 3 1/2″ x 4 1/2″, 2 1/2″ x 2 1/2″, 1″ x 3 1/2″
  • Pool Party Card stock: 3 3/4″ x 4 3/4″

I first stamped the solid leaf image using Pear Pizzazz Ink on the card base. I then created the Tri colored background using the spritz technique by inking the Clear Block E (acrylic block) with Pool Party, Highland Heather and Pear Pizzazz Ink onto the Thick White card stock. I spritzed the block using a Stampin’ Spritzer filled with 70% alcohol. Once that dried I trimmed down to have a slight white border and adhered it to the Pool Party card stock. I stamped the Butterfly from the Touch of Ink stamp set with Black Stazon Ink. Using the Blender Pen I added Gorgeous Grape ink to the image. I trimmed around the image, mounted on Basic Black card stock (trimmed this to)and then added to card front using dimensionals. I add sentiment for the Heal your Heart stamp set and a couple of resin dots to finish it off.

Week Of Color- Day 1

It’s all about Spritz. And no I don’t mean the Christmas Cookies, although they are super yummy. This is about the Color Technique Spritzing. Today’s Project uses the Stampin’ Spritzers filled with water or alcohol. Each day from February 10th through February 16th I will be doing a video or facebook live on how to bring color into your paper crafting.

To further Sale-a-Brate I am offering a Ordering special uniquely through my Online Store. In addition to receiving a Free Sale-a-Bration product with a $50 minimum purchase I will be treating you to a little sumthing sumthing for your crafting area.

Check out this adorable and totally functional adhesive holder for your Crafting area. You won’t have to worry about those dimensionals hiding on you any more!

7 DAY ORDERING SPECIAL!

Receive an exclusive tutorial/video, directions and the supplies for this awesome cute and so very useful Adhesive Holder project! (check it out below) You will ALSO receive two of the adhesives to go inside for FREE! A package of Dimensionals and a brand new Tombow glue! All for FREE with your min. of a $50.00 order placed with me! (This special ends February 16th and you must use the hostess code: MZAFMVZW)

Week of Color: Day 1 Spritzing

Here is a quick and basic card the focus is really on the Spritzing Technique. I may two layers of Spritzed color. the first layer in Mango Medley

Hump Day Lunch Break: Facebook Live 2/3/21

Today’s Hump Day Lunch Break was a sweet little gift box with an attached 3 x 3 card, This is such a fun, quick and cute project that can be used to give cards or a little gift. This project features the Hey Birthday Chick bundle that was just made available on Feb. 2, 2021. You can check out the facebook live on my business page click here. Please like my facebook page and share it with others. To be notified of any time I go live make sure to join the My Stamp Studio Group.

Once I made the first gift box, I knew I have to make more. Check out the next pictures to see how I stamped the inside of the card.

I used the Mini Pizza boxes to create these sweet little boxes. I put strips of card stock around the sides to tie it all together. I created the card by cutting a piece of thick basic white cardstock to be 6″ x 3″ I scored it in half to make a 3″ x 3″ card base. I stamped two sentiments and balloons using the Hey Birthday Chick stamp set. I stamped and cut the little chick and the balloons using the coordinating Birthday Chick Dies. I then added a piece of designer paper that measured 3 1/4″ x 3 1/4″ and adhered this to a piece of colored cardstock that measures 3 3/8″ x 3 3/8″. I adhered this to the card base making sure that the top of the layered DSP/Cardstock was even with the scored side of the basic white card base. This allows you to open the card easily. To make the card front I again used the Hey Birthday Chick Stamp set and Birthday Chick dies. I think this turned out pretty cute.

Cats and Dogs Real Treat Wishes Cards

Today’s Inspiration came from Ange McKay. I had an awesome online treat where she featured a super cute card featuring the Sweet Strawberry Bundle. I knew I had to share this with you. I tweaked her card just a bit and came up with these adorable Dog and Cat Cards you could easily use a a Valentine, Birthday or a simple Thinking of you card.

These two cards were so quick and east to make, but the are really cute. Change the sentiment up to whatever you need. If you would like to watch the facebook live, go to my facebook business page: My Stamp Studio Make sure to like my page and request to join the My Stamp Studio Fan Group so you can get notifications of upcoming events, lives, posts, and shares. Try this card out and share it on the FB group. I would love to see what you come up with.

Cutting Dimensions

  • Real Red card stock: 5 1/2″ x 8 1.2″ scored at 4 1/4″ Card base
  • Smoky Slate card stock: 3 3/8″ x 4 5/8″
  • Playful Pets Designer Series Paper: 3 1/$” x 4 1/2″, 3/4″ x 4″
  • Smoky Slate card stock strip: 1″ x 4 1/4″
  • White card stock for inside of card: 4″ x 5 1/4″

Supply List for the Dog Card

Supply List for the Cat Card

Sale-A-Bration Week 4 Feature Product: Touch of Ink

This week’s Sale-a-bration feature product is the TOUCH OF INK stamp set found on page 12 of the Sale-a-bration catalog.   If you want simple stamping but still want an elegant and amazing look to your project, this is a great set to add to your collection.  There are a total of 17 stamps in this set, 11 image stamps and 6 sentiments.  You get the best of both worlds with this set.  Partner it up with some Designer series paper and card stock and you will have some fabulous cards.  This set is designed to give the images a water colored look.  The “fill-in” images coordinated with the detailed images- but are not designed to be exact.  This is a perfect two step stamping set.  You don’t have to be perfect, you can just have fun with it.  This amazing stamp set can be yours free with a $100 purchase in my Online Store

All through the week I will be posting different cards and projects made using this set.  Tonight’s Live at 6:45 on my facebook business page:  https://www.facebook.com/bethmaxwellmystampstudio/.  This Live video features a Fun Easel card you can make.  Stop over and watch the live or the replay and see how easy this card is to make, Like my Page and Leave a comment to let me know you visited. This may look like its hard, but really it is not. I walk you through all the steps.

Cutting Dimensions

  • 5 1/2″ x 4 1/4″ Granny Apple Green card stock
  • 8 1/2″ x 3 1/4″ Thick Basic White card stock
  • 3 3/8″ x 4 3/8″ Rich Razzleberry Card stock
  • 3 1/4″ x 4 1/4″ Oh So Ombre designer paper

Supply List- click any product below to go to my Online store!

SALE a-bration is in full gear with the Corner Bouquet

I don’t know about you , but I am done with winter. Unfortunately, we have a couple more months of it. Oh well, winters give all of us crafters more time to play. All last week I was playing around with the new Corner Bouquet Stamp Set. You can get this amazing stamp set for FREE, yes free. Any time you spend $50 in my online store you can pick from several different stamp sets and Designer paper and get it for free. This is one of the best times in the Stampin’ Up year, I mean who can pass up free right? In my Hump Day Lunch break facebook live on January 6, 2021, I shared this awesome and easy card.

The fun part of this card was using the new blending brushes. The brush gives that added color and softness to the card and it is so easy to use and clean. If you haven’t already tried one out, you need to. Adding the rhinestones to this card gave it the finishing touches it needed. The Corner Bouquet stamp set is so easy to make cards with. You can leave it a one color or use markers to add more color.

  • Granny Apple Green Card stock: 8 1/2″ x 5 1/2″, scored at 4 1/4″
  • Mango Melody card stock: 5 1/4″ x 4″
  • Basic White card stock: 5″ x 3 3/4″

Supply List: You can click on any of the items below to order from my Online Stampin’ Up! store. Or if you want it all click on the Add All to Cart button.

Here is another card I made using the Corner Bouquet. It was quick, easy and used just a few products. Someone asked me about making some quick sympathy cards on short notice and this is one I came up on the fly. I used use Basic White and Early Espresso Card stock, Early Espresso ink and added in a die cut shape with a little bit of Faux Suede ribbon. If you don’t have ribbon, use a strip of card stock, it adds the same flair.

I stepped up that same card by adding some Designer Paper from the SALE a-bration products called Paper Blooms. I love this paper and can’t wait to make more cards and projects with it. For this card, I used Sahara Sand ink on Basic white cardstock and then used the same image on the designer paper using Mossy Meadow ink. This split card is super easy to make. I do like using dies and punches when I can on my cards, but with this layout you don’t need to.

Tomorrow I will be posting how to use this same stamp set with Stampin’ Write Markers to give your cards a little extra color. See you then!

« Older posts Newer posts »

© 2026 My Stamp Studio

Theme by Anders NorenUp ↑