Beth Maxwell, Independent Stampin' Up! demonstrator

Tag: cardmaking (Page 4 of 4)

Birthday Card Class Series – Week 1

Welcome to the first week in our Birthday Card Class Series. I am so excited to share this series of classes with you. Classes will be held every two weeks through the beginning of August. Each week will have a specific Host code for you to place your order of $35 (retail) in my Online store which tells me you would like to receive that weeks class kit.

Each Class kit contains 4 card kits with all the precut scored and die cut pieces as well as envelopes and ribbon that is used for that card. A color PDF with instructions, measurements and supplies will be emailed to you. If you place a $50 retail order- you will receive that weeks featured embellishment.

you can watch the Class online live on facebook-link below

MY STAMP STUDIO FACEBOOK PAGE

So Let’s jump right into our card making…You can watch the replay on YouTube

Supremely Awesome

LAYERING LEAVES

RHINO READY

LITTLE MONKEY

6 cards in 15 Minutes- Yes it can be done!

Hello and welcome to my blog (website…). Every Monday in June 2023 I will be featuring a new Card using Stampin’ Up! Designer Series Paper. Today is the first episode in my series.

I always need Thank you cards and need to stamp a stack of them quickly. Watch today’s video to see how I did it. Keep in mind that the designing and the prepping of the card takes a little more that 15 minutes. But once you have your idea and create you first card- you are all set to whip out a stack of cards.
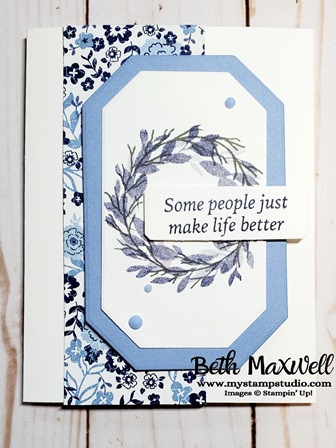
Click this image to jump over to YouTube to watch the video

Cottage Wreath and Countryside Suite

Measurements:

  • Thick Basic White cardstock: 5-1/2″ x 8-1/2″ scored at 4-1/4″
  • Countryside Inn DSP: 2″ x 5-1/2″
  • Boho Blue Cardstock: 3-1/4″ x 4-3/4″
  • Basic White Cardstock: 2-3/4″ x 4-1/4″
  • Supplies listed below and you can also download the supply list below

Hump Day Lunch Break- Share a Milkshake

Who says you can’t have your dessert first? As my Grandmother got older she would tell me to enjoy dessert first cuz that is the best part of the meal. So Today I decided to Share a Milkshake before running down for lunch. Each Wednesday I bring a quick card to you while you enjoy your lunch.
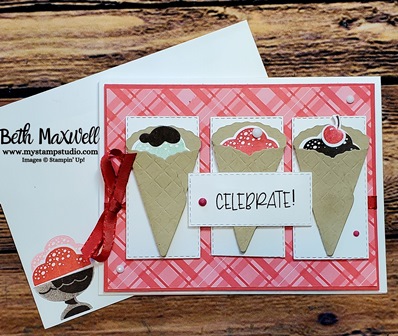
Share a Milkshake card from March 15, 2023 Hump Day Lunch Break

You can check out the whole step by step process in my YouTube Video below

Something Old, Something New, Something Borrowed, Something Blue…

This thought popped in my head today and I decided to run with it. No, we are not making wedding cards…but could.

I was inspired by a card post I was from Chris Johnson from Kentucky. I just actually received this hostess set from the January -April Mini Catalog. You can get it to. How you ask? Host a party, a kit night, collect orders from friends and have a qualifying workshop. I offer, In Person and Online workshops as well as classes. Reach out to me if you don’t already have a demonstrator and would like to get free Stampin’ Up Products. Click on the Host A Party Image on the right ——->

The At the Pond stamp set is available as a Host Reward January 5, 2023 – May 1, 2023.

Item code 160801 Contact me to learn how you can get this Stamp set and have as much fun as I am having with it.

On to the card…that I was inspired to make. The card base is Coastal Cabana (8-1/2″ x 5-1/2″ scored a 4-1/4″. I added a layer of Crumb Cake cardstock (5-1/4″ x 4″) to the card base. I started with the Oceanfront Stamp Set and used Balmy Blue, Coastal Cabana, Soft Suede to create the background on a 5″ x 3 1/4″ piece of Basic White cardstock. I then used the images from the At the Pond set to add the Cattails in with Soft Suede and Granny Apple Green Inks. I used the grass and speckle image from the Oceanfront stamp set to continue making my landscape. I then adhered the Basic White cardstock to the card front.

Now the fun part. On a scrap piece of Basic White Cardstock, I stamped the Frog image with Tuxedo Black Memento Ink, then used Granny Apple Green I stamped the “solid” image shape of the frog over the detailed image. Next, I stamped the Detailed Log image using Tuxedo Black Memento Ink. I used the solid image from the stamp set and stamped off the Soft Suede ink before I stamped over the detailed image. And finally I stamped the Dragonfly using Tuxedo Black Memento Ink. I colored the image using Balmy Blue and a Blender. I fussy cut out all three images, added dimensionals and adhere to the card front.

To finish off the card, I stamped a phrase from the Sending Support Sale–bration stamp set and placed Faux Sea Glass in clusters of 3 around the card front. So what do you think? Leave a comment below and let me know your thoughts. Below the card images are all the supplies I used to make this card. These are available in my Online Store click HERE or use the images below to jump over to my Stampin’ Up! store.

I decided to continue on with this card design and just swap out my stamp set. I used the Heron Habitat and coordinating Heron Dies. You can purchase the Stamp set and Dies as a bundle and save 10% or you can purchase them individually. Again the supplies used for this card are listed below. Just click on the product image o jump over to my store.

Looking for more ideas using the At the Pond Stamp set? Check these cards out made by Stampin’ Up!

Pg 90 of the January-May 2023 Mini Catalog

Okay, Okay just one more card- this just cracked me up. I find when I am nervous, anxious or frightened I tend to start joking around and being silly to get me out of that funk. I just thought this was funny, I mean, who else but a frog would want to eat a fly? just sayin. I used the card above for inspiration and then just switched out my stamp set. I used the At the Pond and Sending Support Stamp sets. The outside sentiment reads: Courage is being really scared and doing it anyway. The inside sentiment is YOU’VE GOT THIS. A little Wink of Stella on the Frog and Flowers, Balmy Blue Variegated Ribbon and Dimensionals make this card pop.

Resisting Fall Colors

I don’t’ know about you , but one of my most favorite thinga about fall is the changing of the leaves. They go from various colors of green to yellow, orange, red, purple. It is one of the most gorgeous times of the year here in Wisconsin. The fall colors inspired me to use Blackberry Bliss and well if you are going to use that color, you may as well add in Rich Razzelberry and Fresh Freesia. Stampin’ UP!s colors coordinate so well together. And you know that the cardstock, ribbon, inks etc will all match. It’s granimals for adults.

Today’s Hump Day Lunch Break (featured as a FACEBOOK LIVE and them Uploaded to YouTube features the Soft Seedlings Stamp set and the wonderful colors mentioned above.

Measurements

  • Fresh Freesia Cardstock: 8-1/2″ x 5-1/2″
  • Blackberry Bliss Cardstock: 5-1/4″ x 4″
  • Basic White Cardstock: 5″ x 3-3/4″, scrap for label
  • Rich Razzleberry Cardstock: scrap for punched image

Products used to make card show below- click on image link to jump to my Online Store

All the supplies used today are available in my Online Store: If ordering in October please use this host code link when placing your order: RZSCGFDB

Here are just a few more card ideas. Staying with the Color Resist Technique, I tried out using Very Vanilla cardstock as well as Basic white cards stock with Soft Succulent and Soft Suede inks. I mounted the card fronts to Evening Evergreen cardstock to given them some depth. This time I changed up the sentiments that were used. I chose the Charming Sentiments and coordinating Sentiment Silhouettes dies. Did you know that you can bundle the two and save 10%? You can check it out in my Online Stampin’ Up! store

Newer posts »

© 2024 My Stamp Studio

Theme by Anders NorenUp ↑